how to solve problems related to virtualization
Questions and Answers :
Windows :
how to solve problems related to virtualization
Message board moderation
| Author | Message |
|---|---|
|
Send message Joined: 4 Jan 20 Posts: 60 Credit: 516,736 RAC: 0 |
This project uses virtualbox with feature 64 bits. How to Check If Virtualization is Enabled in Windows 10?  How to Check If Virtualization is Enabled in BIOS?  How to know if Virtualization is possible with your cpu? intel tool  amd tool  leomoon_cpu-v 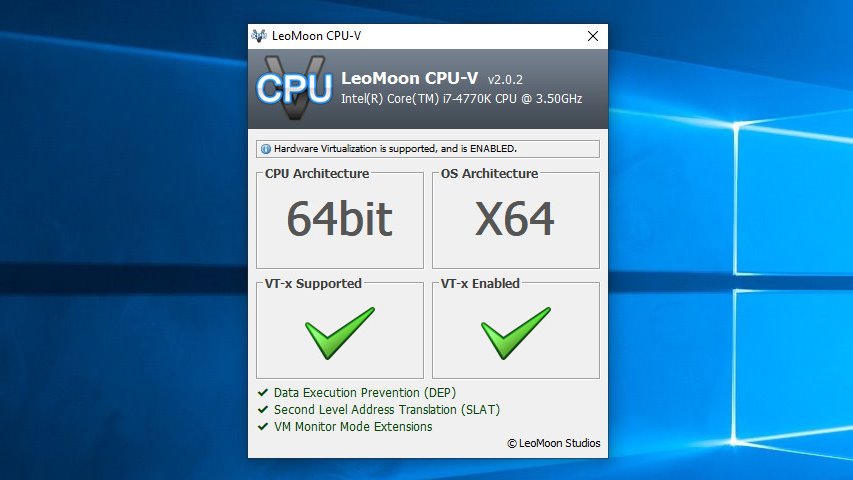 |
|
Send message Joined: 4 Jan 20 Posts: 60 Credit: 516,736 RAC: 0 |
How to enable virtualization in your bios with windows 10 ? Press Windows + I : and follow step by step : 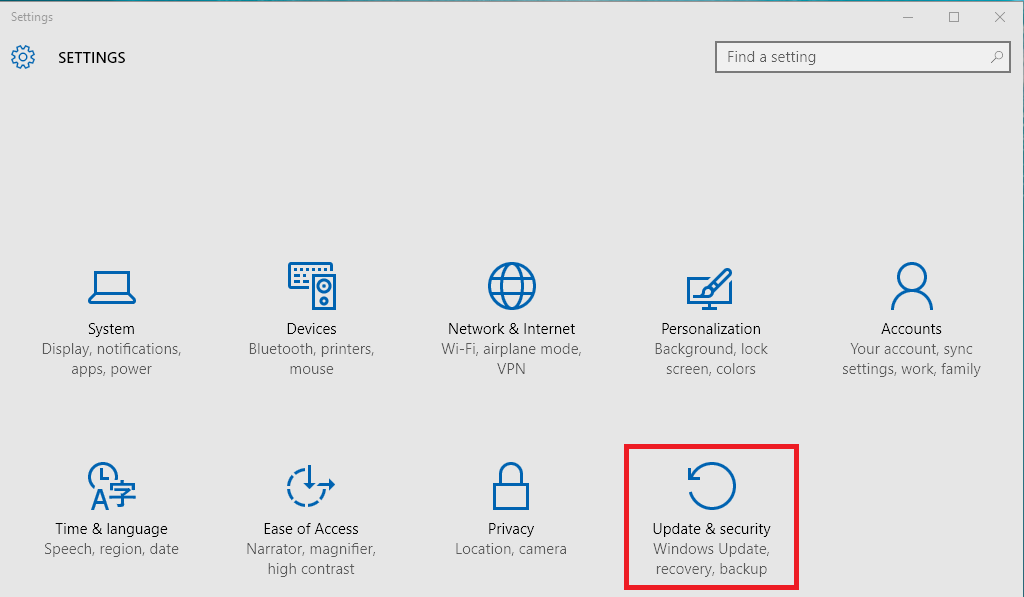 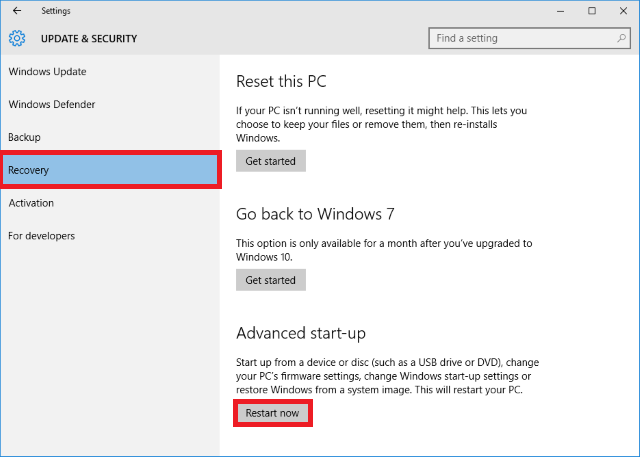 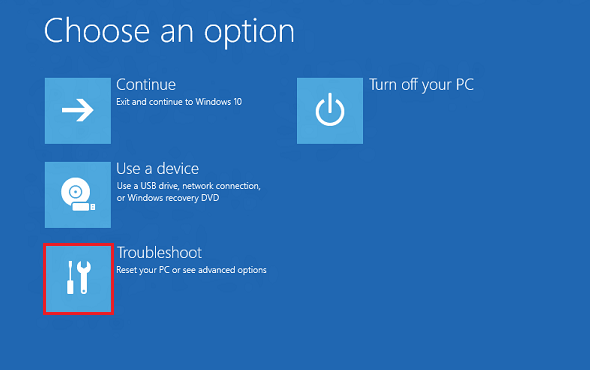 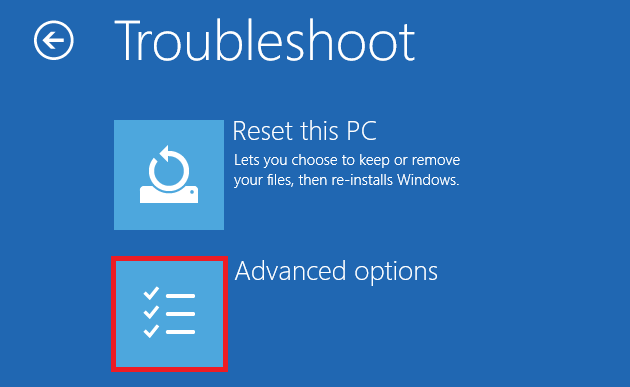 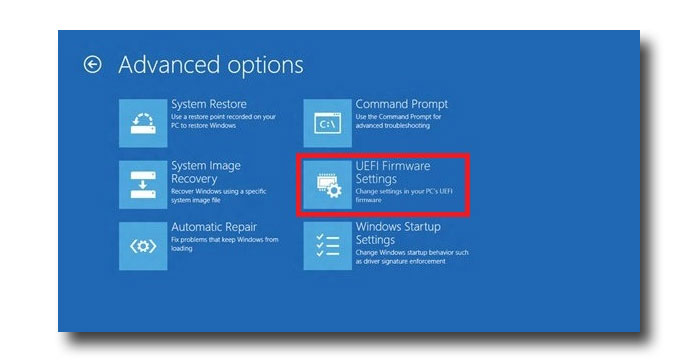 Reboot now your computer. According to your configuration (motherboard and cpu) , you will have to press one of these keys : [Echap] , [F2] , ... , [DEL] Then enable the right item : (corresponding to virtualization which can be different depending on the bios version)  Then press [F10] , YES and ENTER to save the change and go on the reboot. |
|
Send message Joined: 4 Jan 20 Posts: 60 Credit: 516,736 RAC: 0 |
How to disable Hyper-V : Virtualbox and Hyper-V are in conflict when they are both present in Windows 10, so you need to disable Hyper-V. In the windows search bar (cortana) : type " programs and features " then click on the first result " enable or disable windows features" A windows appears : According to the windows version you own : Windows 8 Pro 64-bit Edition Windows 8 Entreprise 64-bit Edition Windows 8.1 Pro 64-bit Edition Windows 8.1 Entreprise 64-bit Edition Windows 10 Entreprise 64-bit Edition  Windows 10 Pro 64-bit Edition 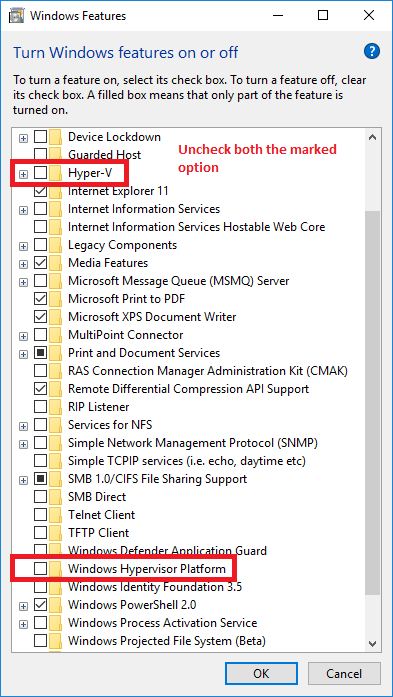 Windows 10 Home (Version 1809) 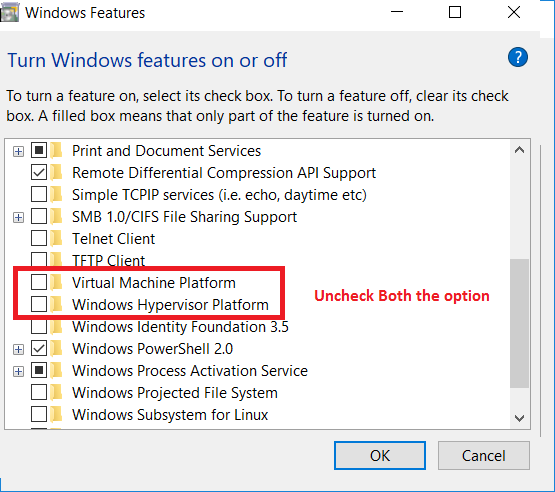 Final step is : 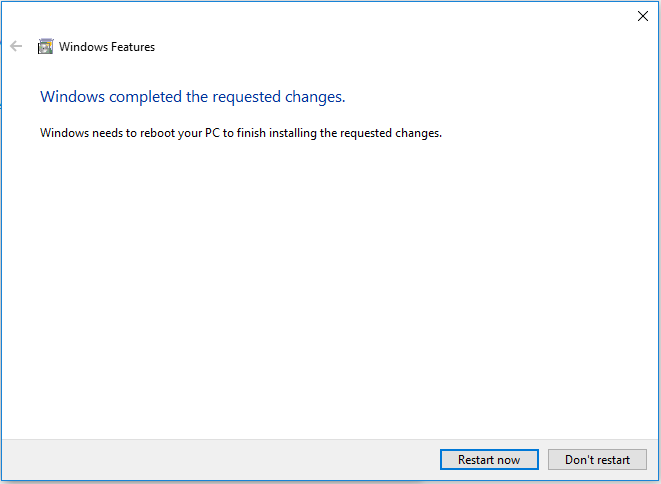 |
|
Send message Joined: 23 Jul 19 Posts: 289 Credit: 464,119,561 RAC: 0 |
Big thank you for this tutorial ! Benoit |
|
Send message Joined: 31 Dec 19 Posts: 5 Credit: 53,633 RAC: 0 |
Hi, thank you for the tutorial. I did all these steps, but I'm still getting the same error as before, as damotbe pointed out to me in this post (https://quchempedia.univ-angers.fr/athome/forum_thread.php?id=45#398) that also shows up after following your tutorial, like in this task (https://quchempedia.univ-angers.fr/athome/result.php?resultid=756483). I double checked all the steps to see if they were still set correctly: Virtualization still shows 'Enabled' in the task manager and the two boxes for 'Virtual Machine Platform' and 'Windows Hypervisor Platform' are still unchecked. So I don't really know what went wrong anymore, can you help me with this? I'm happy to provide any screenshots or error logs you might need to see or other info about my laptop that you need to know. Thanks in advance! |
|
Send message Joined: 3 Oct 19 Posts: 43 Credit: 40,548,179 RAC: 0 |
You are getting this error: Error Code: ERR_CPU_VM_EXTENSIONS_DISABLED You need to reset the p_vm_extensions_disabled tag in the client_state.xml file, see this post on how to do that... https://quchempedia.univ-angers.fr/athome/forum_thread.php?id=20&postid=156#156 |
|
Send message Joined: 31 Dec 19 Posts: 5 Credit: 53,633 RAC: 0 |
It works now, many thanks to you guys! Keep up the good work. |
|
Send message Joined: 4 Jan 20 Posts: 60 Credit: 516,736 RAC: 0 |
How to access bios settings with Windows 7: Here is a tutorial 2 parts are important : "Part 3" and "Part 5" : --- Part 3: How to Enter BiOS Settings on Windows 7 Follow the easy steps below to access the BIOS setup utility on DELL/HP/ASUS/SONY/SAMSUNG laptop and PC: 1, Start your computer. Pay close attention to the first screen that appears. Look for a notification that tells you which key or combination of keys to press to enter BIOS settings. 2, If you press in time, the BIOS screen opens (normally on a blue background). This is also called the CMOS setup program, as it saves all settings to a piece of memory known as the CMOS. 3. Use the arrow keys to highlight an option and Enter to select. 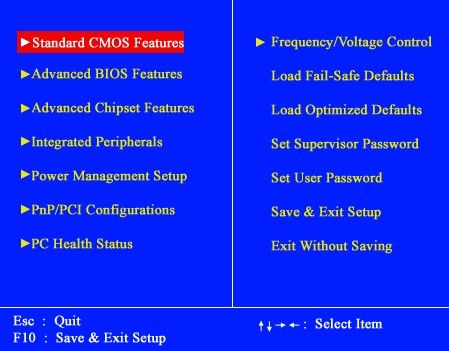 4. To change a setting, you normally use the 'page up' and 'page down' keys, but some systems require '-' and '+' or to press enter and select from a list. 5. Usually the ESC key returns to the previous menu, but again, check what the screen tells you 1st. 6.Once you have finished with the BIOS, press F10 to save the settings (or select "save and exit") and reboot your computer. 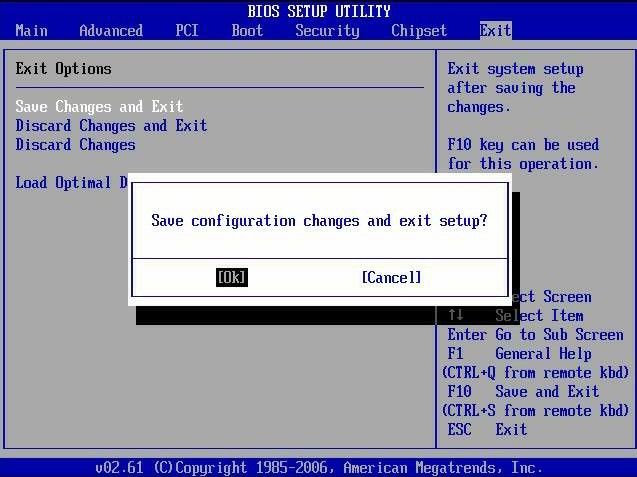 --- Part 5: Problems on Accessing BIOS Configuration on Windows 7 Entering BIOS can be tricky so here's some more help based on some common scenarios that I've seen: 1, See a picture instead of a message? Your computer may be configured to show your computer's logo instead of important BIOS messages. Press Esc or Tab while the logo is showing to remove it. 2, See the message but didn't catch which key to press? Some computers start too quickly to see the BIOS access message. If this happens, press the Pause/Break key on your keyboard to freeze the screen during startup. Press any key to "unpause" your computer and continue booting. 3, Having troubles pausing the startup screen? If you're having problems pressing that pause button in time, turn on your computer with your keyboard unplugged. You should receive a keyboard error which will pause the startup process long enough for you to see the keys necessary to enter BIOS! Now you can access BIOS in windows 7 without restarting. Just Share this post with your friends and families and help them when they have met the similar issues. |
|
Send message Joined: 4 Jan 20 Posts: 60 Credit: 516,736 RAC: 0 |
BIOS Setup Utility Access Keys for Popular Computer Systems Acer Aspire, Predator, Spin, Swift, Extensa, Ferrari, Power, Altos, TravelMate, Veriton Press Del or F2 immediately after powering on. The Acer Veriton L480G uses F12. The BIOS on the Acer Altos 600 server uses the Ctrl+Alt+Esc key and the F1 key for advanced options. Older Acer computers may use also use the F1 or Ctrl+Alt+Esc keys to access BIOS. Asus B-Series, ROG-Series, Q-Series, VivoBook, Zen AiO, ZenBook Press (or press and hold) F2 until you see the BIOS screen. You may need to press the key repeatedly until the BIOS utility appears. Some Asus laptops require that the Del, Esc, or F10 key be pressed instead. Older Asus computers might boot to the BIOS setup utility only if you hold down the Esc key until you reach the Boot Device Selection screen; continue to BIOS by selecting Enter Setup from the menu. Compaq Presario, Prolinea, Deskpro, Systempro, Portable Press F10 while the cursor in the top right corner of the screen is blinking. Older Compaq computers may use the F1, F2, F10, or Del key to give access to BIOS. Dell XPS, Dimension, Inspiron, Latitude, OptiPlex, Precision, Alienware, Vostro Press F2 when the Dell logo appears. Press every few seconds until the message Entering Setup appears. Older Dell desktops and laptops may instead use Ctrl+Alt+Enter or Del to enter BIOS. Older Dell laptops may use Fn+Esc or Fn+F1. eMachines eMonster, eTower, eOne, S-Series, T-Series Press Tab or Del while the eMachine logo displays on screen. Other eMachine computers may use F2 to enter BIOS. EVGA SC17, SC15 Press Del repeatedly while the EVGA laptop is booting. Fujitsu LifeBook, Esprimo, Amilo, Tablet, DeskPower, Celsius Press F2 once the Fujitsu logo appears. Gateway DX, FX, LT, NV, NE, One, GM, GT, GX, SX, Profile, Astro Press the F1 or F2 key repeatedly after restarting the Gateway computer to access the BIOS Setup utility. You might have to press and hold the key in order to reach BIOS. Hewlett-Packard (HP) Pavilion, EliteBook, ProBook, Pro, OMEN, ENVY, TouchSmart, Vectra, OmniBook, Tablet, Stream, ZBook Press the F1, F10, or F11 key after restarting the computer. HP Tablet PCs may use F10 or F12. Other HP computers may allow access to BIOS using the F2 or Esc keys. Still others might require that you press the Esc key and then F10. IBM PC, XT, AT Press F1 immediately after powering on the computer. Older IBM computers (including some laptops) may utilize the F2 key for BIOS entry. Lenovo (formerly IBM) ThinkPad, IdeaPad, Yoga, Legion, H535, 3000 Series, N Series, ThinkCentre, ThinkStation Press F1 or F2 after powering on the computer. Some Lenovo products have a small Novo button on the side (next to the power button) that you can press (you might have to press and hold) to enter the BIOS setup utility. You might have to then enter BIOS Setup once that screen is displayed. Press F12 to access BIOS. Older Lenovo products allow access to BIOS using Ctrl+Alt+F3, Ctrl+Alt+Ins, or Fn+F1. Micron (MPC Computers) ClientPro, TransPort Press F1, F2 or Del immediately after powering on the PC. NEC PowerMate, Versa, W-Series Press F2 to enter the BIOS Setup. Packard Bell 8900 Series, 9000 Series, Pulsar, Platinum, EasyNote, imedia, iextreme Press F1, F2, or Del to enter BIOS. Samsung Odyssey, Notebook 5/7/9, ArtPC PULSE, Series 'x' laptops Press F2 to start the BIOS setup utility. You might need to press this key repeatedly until the BIOS screen appears. Sharp Notebook Laptops, Actius UltraLite Press F2 after the computer starts. Some very old Sharp PCs require a Setup Diagnostics Disk to access BIOS. Shuttle Glamor G-Series, D'vo, Prima P2-Series, Workstation, XPC, Surveillance Press F2 or Del on startup. Sony VAIO, PCG-Series, VGN-Series Press F1, F2 or F3 after turning on the computer. Toshiba Portégé, Satellite, Tecra, Equium Press F1 or Esc after powering on to access BIOS. Press F12 on a Toshiba Equium. |
|
Send message Joined: 27 Nov 20 Posts: 2 Credit: 0 RAC: 0 |
Greetings! I have been running BOINC on my computers for years; last month joined QuChemPedIA but none of the work units will process, giving thid message after 14 seconds: Postponed: Communication with VM Hypervisor failed. Using Windows 10 on a Lenovo laptop (quad core), with 16 gigabytes RAM on a 64 bit system. Other BOINC projects processing without issues. Latest versions of VirtualBox and BOINC installed.Would like to help with this project; how can this problem be corrected, please? Thanks! |
|
Send message Joined: 13 Oct 19 Posts: 87 Credit: 6,026,455 RAC: 0 |
Unhide your computer There is a good tutorial about setting up your system here: https://quchempedia.univ-angers.fr/athome/forum_thread.php?id=44&postid=662 |
|
Send message Joined: 27 Nov 20 Posts: 2 Credit: 0 RAC: 0 |
Tried all those suggestions, but still get same error. Removing project from BOINC. If you want more people for QuChem, fix it to run without VirtualBox. Good luck! |
|
Send message Joined: 28 Aug 20 Posts: 7 Credit: 639,000 RAC: 0 |
bonjour comment ne plus avoir les messages vm job unmanageable,restarting later sur ce projet. j'ai essayé de changer plusieurs fois les paramètres mais cela ne fait rien. cela fait un moment que je galère la dessus. merci d'avance |
|
Send message Joined: 5 Sep 20 Posts: 103 Credit: 2,142,600 RAC: 0 |
I simply exit BOINC killing all running tasts then restart the BOINC manager. Mon Francais is not good enough. Tullio |
|
Send message Joined: 28 Aug 20 Posts: 7 Credit: 639,000 RAC: 0 |
merci de la réponse mais cela je le sais. je ne cherche pas une solution temporaire car le problème revient. je cherche une solution définitive pour faire un max de calcul en simultané sur quchem. merci d'avance |
|
Send message Joined: 3 Oct 19 Posts: 43 Credit: 40,548,179 RAC: 0 |
merci de la réponse mais cela je le sais. Bonsoir ! Your host 9107 with Virtualbox 6.1.28 installed is getting error messages: VBoxManage.exe: error: Call to NEMR0InitVMPart2 failed: VERR_NEM_INIT_FAILED (VERR_NEM_VM_CREATE_FAILED) See this link that suggest you should downgrade to Virtualbox 6.1.26 to fix those errors: https://forums.virtualbox.org/viewtopic.php?t=104175 |
|
Send message Joined: 5 Sep 20 Posts: 103 Credit: 2,142,600 RAC: 0 |
I am using VBox 6.1.28 also on LHC@home tasks such as Atlas@jome, CMS@home and Theory@home with good results. Yullio |
|
Send message Joined: 3 Oct 19 Posts: 43 Credit: 40,548,179 RAC: 0 |
I am using VBox 6.1.28 also on LHC@home tasks such as Atlas@jome, CMS@home and Theory@home with good results. @Yullio, did you read the link I provided ? You are running Windows 11, pascal768 is running Windows 10. In another thread you said you were getting good results at this project with 6.1.28 but you have more invalids than you have valid results, not a good sign. |
|
Send message Joined: 28 Aug 20 Posts: 7 Credit: 639,000 RAC: 0 |
bonjour j'utilise windows 10 21h1 cpu i7 9750h, 32gigas ram et oracle vo 6.128 j ai utilisé la 6.122 cette nuit et le probleme est identique. merci a tous pour votre aide |
|
Send message Joined: 28 Aug 20 Posts: 7 Credit: 639,000 RAC: 0 |
je rajouterais que sur lhc@home je n'ai pas de problemes |

©2025 Benoit DA MOTA - LERIA, University of Angers, France